The best tools for time tracking in monday.com
In an age where job roles require juggling multiple website tabs and a boatload of tasks, we need time tracking tools that are agile enough to catch them all.
Team leaders are using hybrid management styles and granting their employees accountability to manage their own time. But who can track time better than the employee who is clicking back and forth? This has all been figured out by clever apps you can find on monday.com, where time records can easily be added to hundreds of separate tasks, and logged in 10 seconds or less.
But which time tracking app or feature should you choose to record hundreds of work hours and keep everyone accountable? Keep reading as we highlight the best time tracking tools on monday.com.
1. The Time Tracking Column
For team members who would like a top-line overview of their work, monday.com offers a method of time tracking that all group members can see via their dashboard: the time tracking column! This one’s great if you just want a simple time log directly on your monday boards.
How to use the Time tracking column
Go to your chosen monday.com board and click the plus sign to ‘Add column’.
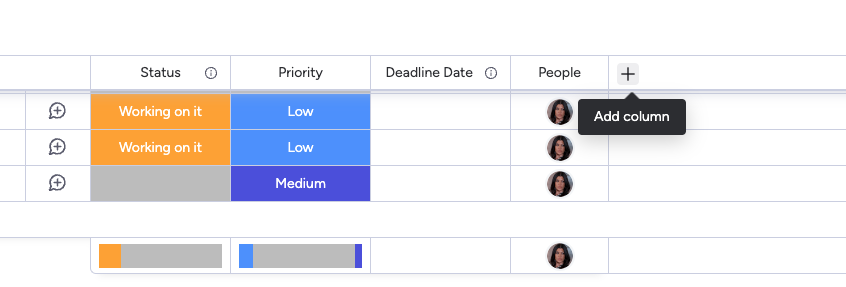
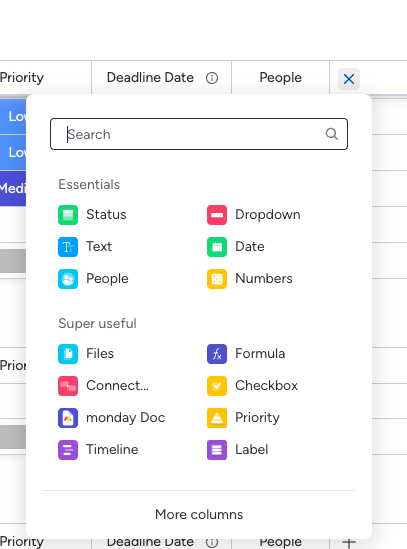
This will show the column menu, if the time tracking option is not there, use the search field to enter ‘Time Tracking’. The icon will appear and you can click to add the column to your group.
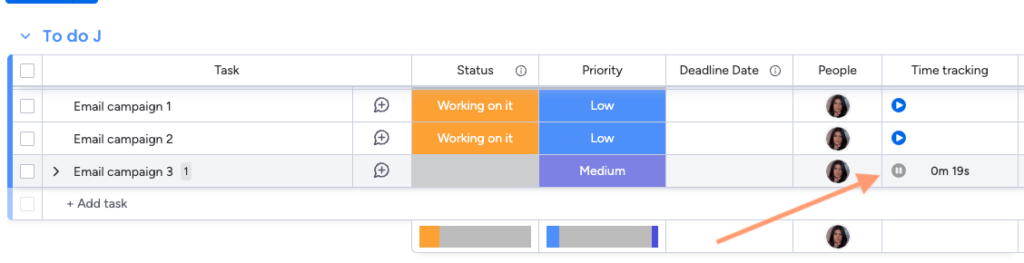
Now that you have your time tracking column, you will see blue icons appear in each cell. These buttons start a live timer when you click them, so you can monitor time spent on each task by tapping in and out from your dashboard view. When you pause the button, the record will show. Click the digits to open the Time Tracking Log.
The Time Tracking Log holds a range of options, from adding further sessions manually in a compact space or exporting the whole log to Excel. Each log can also be swiftly deleted by clicking the bin icon. Pressing ‘Clear’ will delete all of the time logs.
The key to understanding the Time tracking column is that the summary of the manual sessions will show in the total time. When you press the stopwatch on the cell, this time will accumulate and add to the total of all the sessions. So ultimately, you will see the total time for the entire task in the time tracking column.
This monday.com tool is clear to use and provides an overview so that you can compare tasks within your groups. Team members can also export the information to Excel to view a detailed summary of each team member’s time logs.
2. The Clockwork App
An ergonomic time tracking app to use on monday.com is Clockwork. With Clockwork, recording time is quicker than ever, and you’re able to view group timesheets to see a team’s recorded time.
The app combines number values from different time entry styles and workers can trigger a live stopwatch or add hours manually within it. You can also integrate the external time tracking column with the internal app. Once it integrates, the column values feed through the hours and minutes automatically to show in the Clockwork hub. Other apps do not integrate in this way from the time tracking column. We explain how to integrate the Clockwork app with the Time Tracking column in the next section.
How to time track using Clockwork
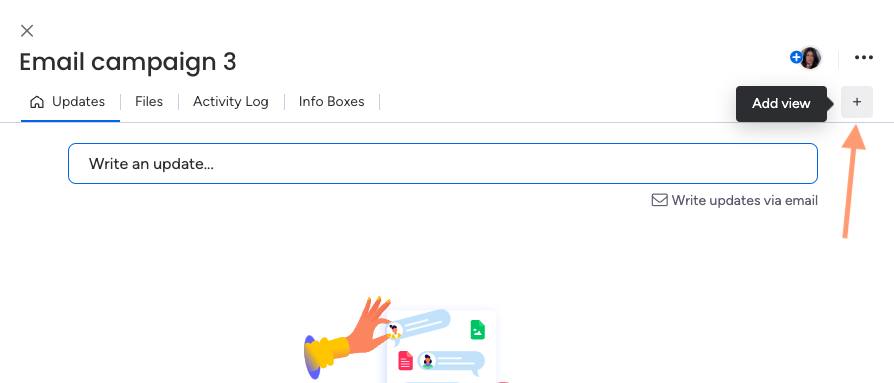
To begin logging time on Clockwork, select the conversation icon on the item you are working on.

This will open up the monday.com Updates area where you can discuss items with your team. If Clockwork is not already there, click the plus button on the right.
This will open the apps area. Search for Clockwork and the app will appear.
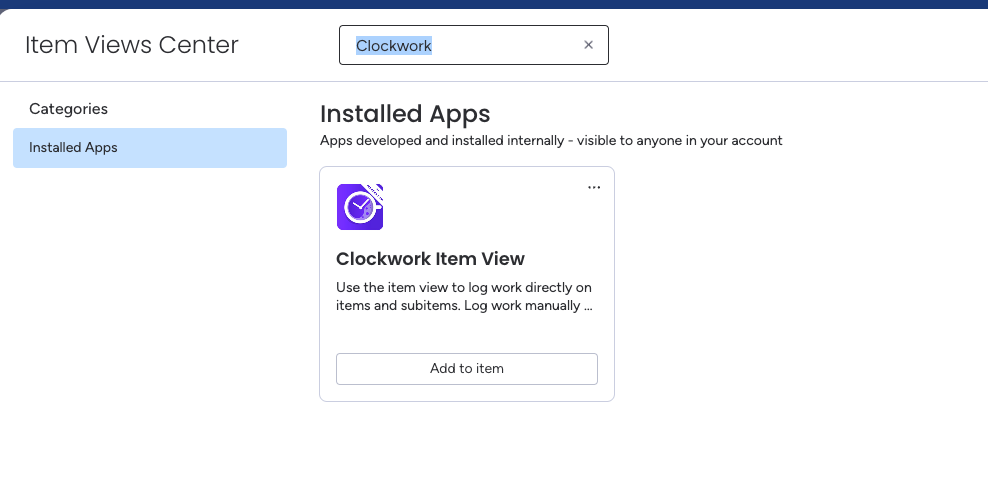
Click ‘Add to item’ and the app will be installed on your task area. Once the tab is visible, you can also rename the tag if you choose to.
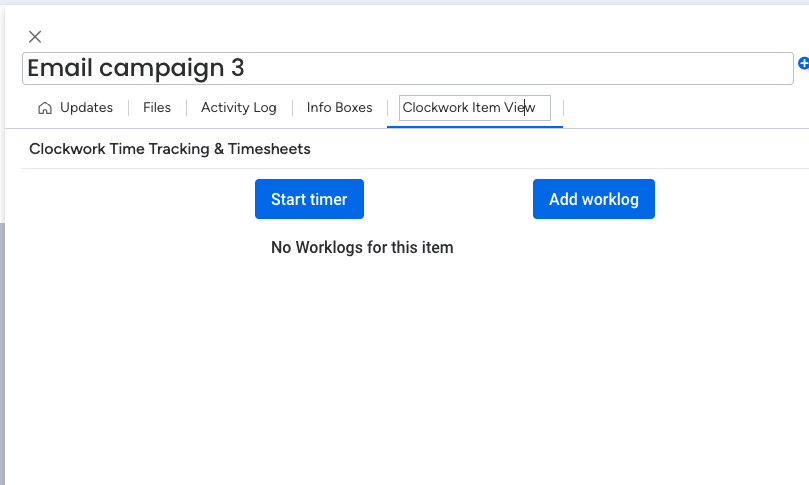
Once the Clockwork view is visible, the quickest option for tracking time in a fast-paced environment would be to hit the ‘Start timer’ button.
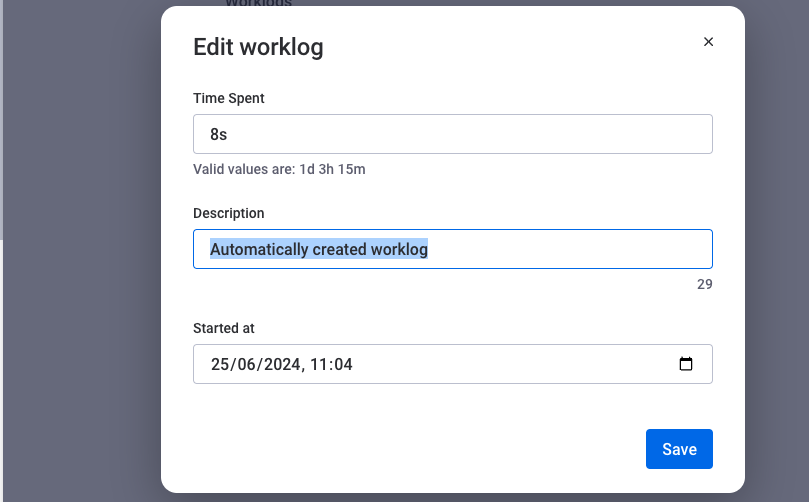
When you stop the timer this will automatically create a timelog that you can leave undefined or add details to. If you click the worklog you will have the option of editing the time spent and also changing the description or time of day it was started.
You can create additional and separate time logs within the same item if you would like to stop, go away and come back to the task later on.

Or, you can create a customised timelog without having to start a timer. Clicking the ‘Add worklog’ button will give you the option to create a fresh timelog with all the details and times written from scratch. This helps you to add several hours that you may have forgotten to add when you were busy!
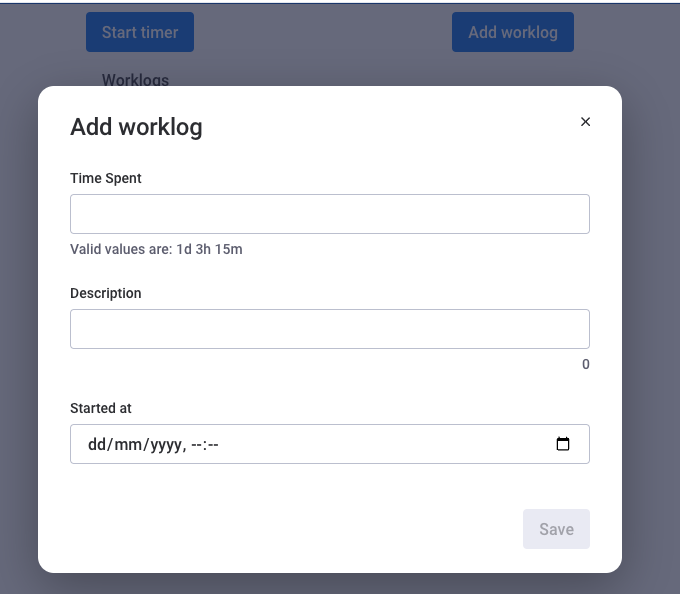
These fields only respond to the correct format. There is a prompt beneath the time spent that specifies the valid values, add ‘d’ for days, ‘h’ for hours and ‘m’ for minutes in order for the time value to be recognised by Clockwork. Once you have completed this, click ‘Save’.
This app can also be used for subitems on your monday.com boards if you would like to analyse which parts of the project took the longest.
Integrate the Time Tracking Column to Clockwork
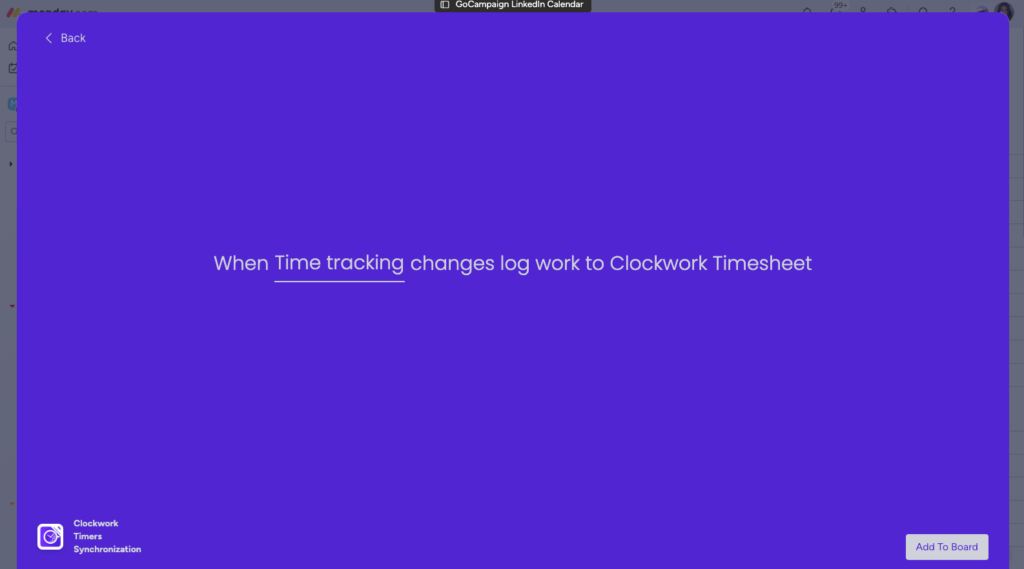
To integrate Time Tracking column data so that it shows in the Clockwork internal log, click ‘Integrate’ on the top right of your workspace.
Type ‘sync’ and select ‘Clockwork Timers Sync’.
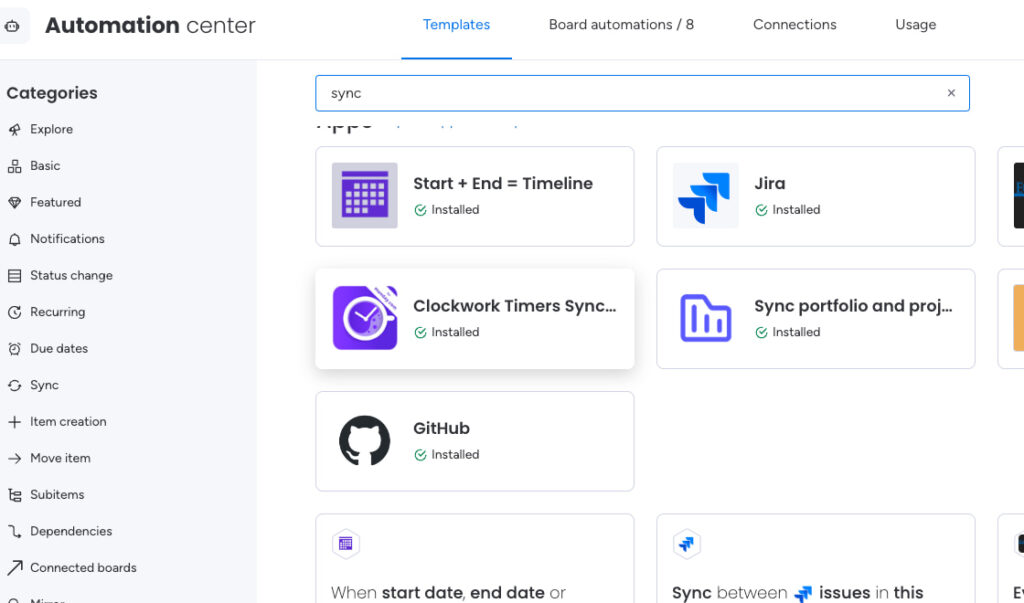
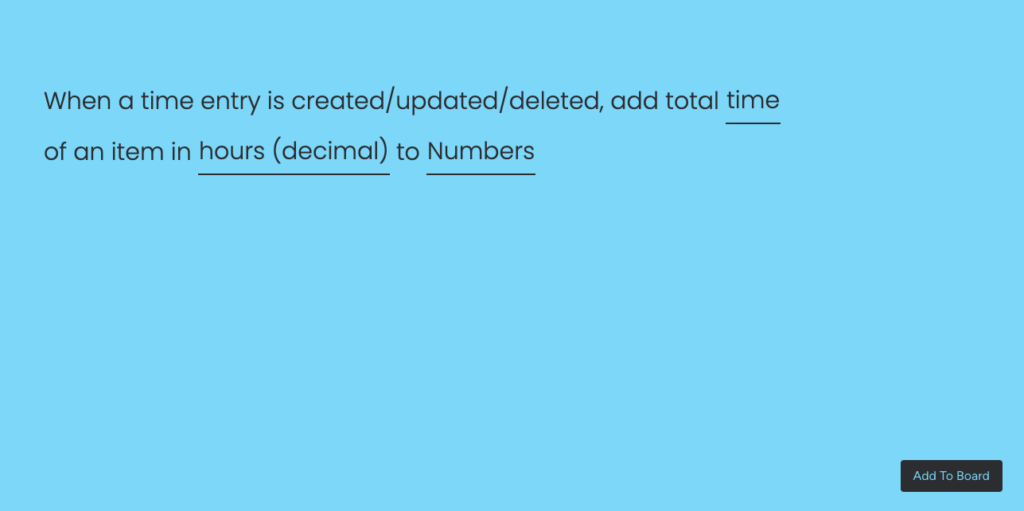
This will open the automation menu. Modify the automation to When ‘Time tracking’ changes log work to Clockwork Timesheet. Then click ‘Add to board’
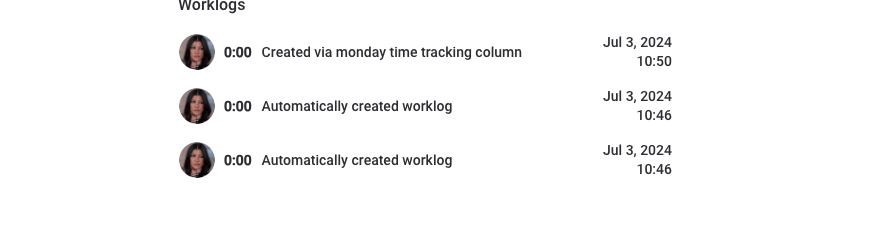
Now your time tracking column entries will show in your Clockwork worklog, and also show the varying sources.
3. The Tracket App
Tracket is an alternative time-tracking app on monday.com that works in a similar way to Clockwork, but has the option to tag pre-programmed categories and report on the data .
The popular tracking app, used by a range of big marketing brands, is easily accessible within your project items so team members can add logs and custom edit their hours while they are working on the item. It has a secure reporting area for team leaders, advanced exporting functions and the app handles large amounts of data.
Unlike the Clockwork app, you can integrate the time values to show on an external text or number column so the hours are automated to reflect as words or round up numbers. It adds further creative options to your monday.com board, but it doesn’t integrate to the time tracking column stopwatch as Clockwork does.
How to time track time using the Tracket app
Using the same method to add an app to your project item, click the plus sign on the right of the conversation area of your item.
Once the app library opens, search for Tracket and it will appear. Click ‘Add to item’
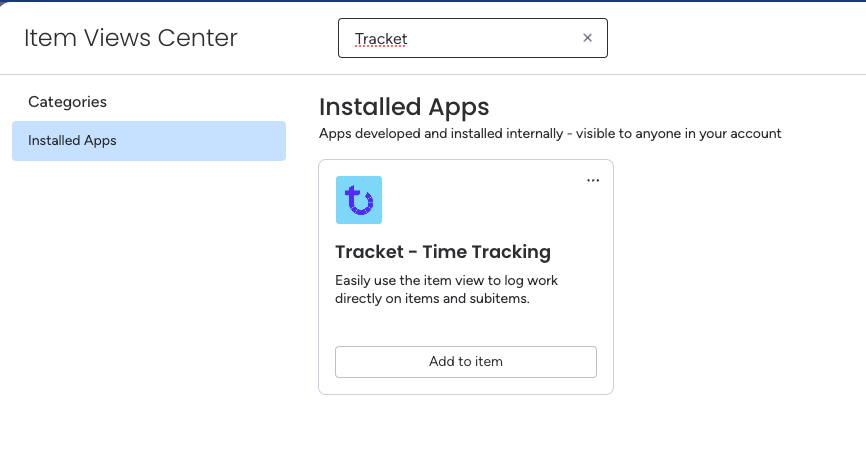
Tracket also has the option to rename the tab within your item to any name that suits you. Sometimes ‘Tracket’ or ‘time-tracking’ is the easiest to differentiate among other tabs.
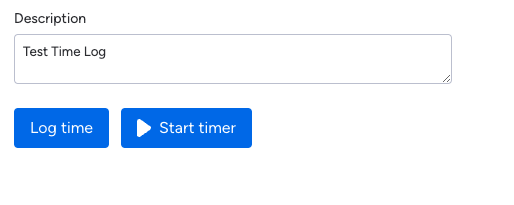
To open the tracking tool, click the ‘Tracket – Time Tracking’ tab and wait a few seconds for it to load. This will show the fields to add your time log, where you can add the hours, minutes and the description. After filling out the compulsory fields labelled with asterisks, click ‘Log time’ to save.
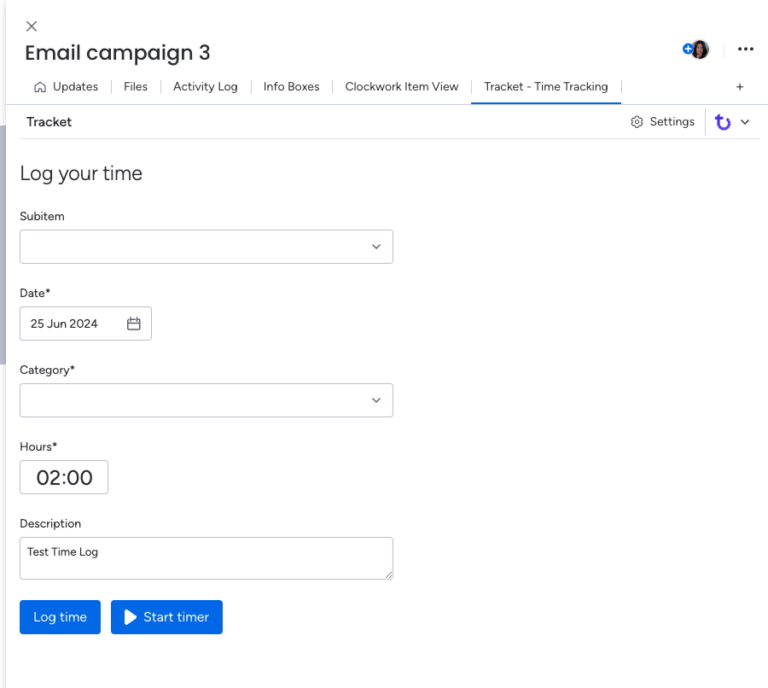
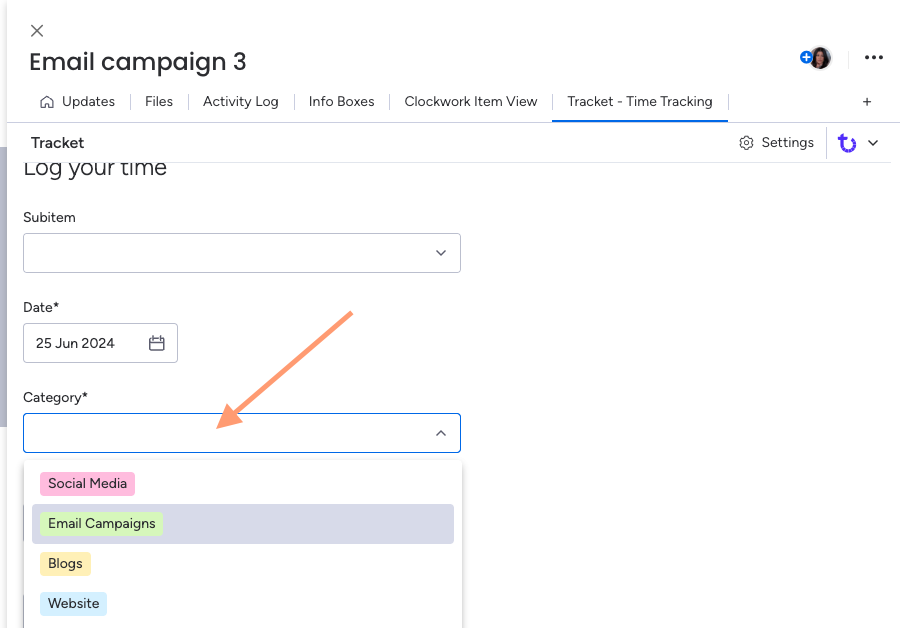
To optimise analysis and reporting, Tracket has the option to tag a category to the time log. If you click the ‘Category’ dropdown menu, the categories will appear in their colours so that when you are reporting your work in future, you can gain insights into your areas of work with colour-coordinated charts.
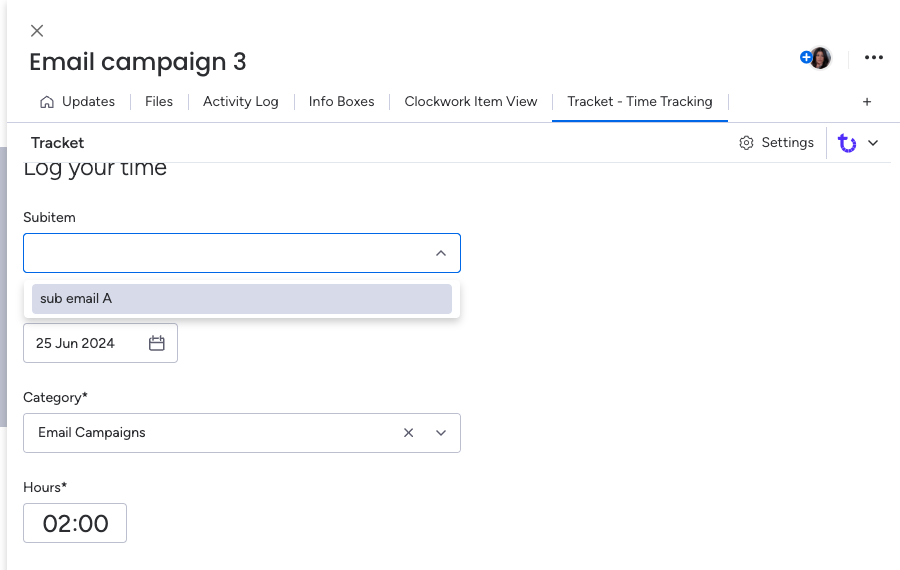
If you have a range of sub items within your project, you can select the relevant ‘subitem’ within your Tracket logging menu. Click the dropdown menu and your sub items will show. Select one and it will tag to your log.
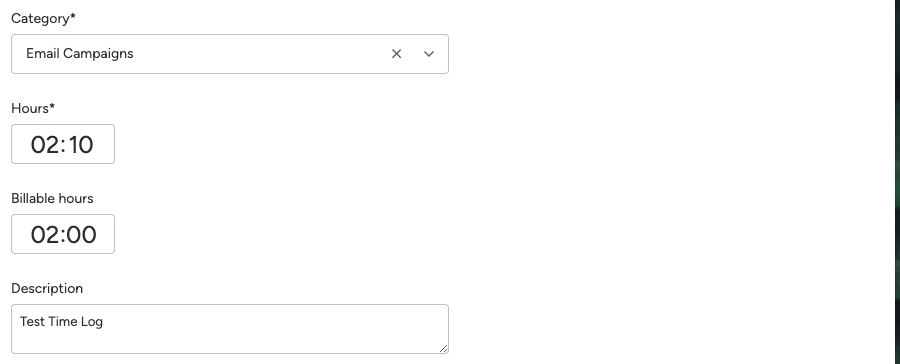
If you would like to know how to add billable hours to your time log, this feature will appear when you select an item category above. Here you can add billable hours to a meeting or project.
To submit your time, click ‘Log time’ and this will add the record to your history.
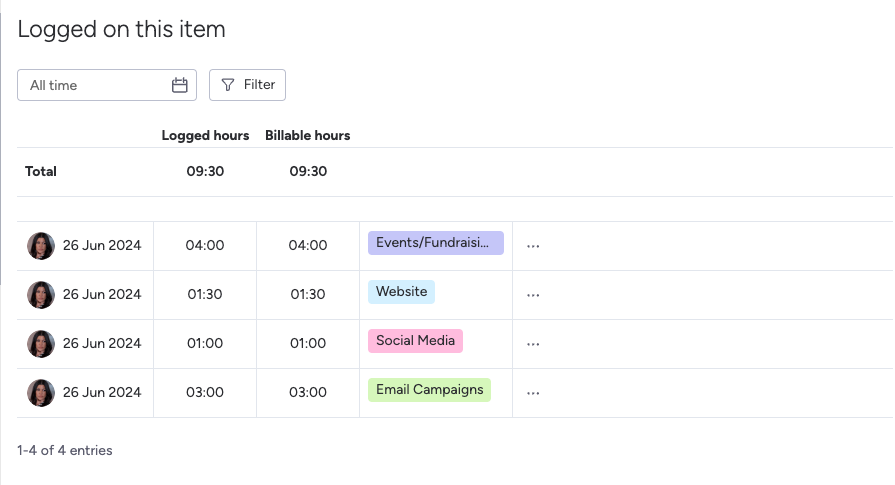
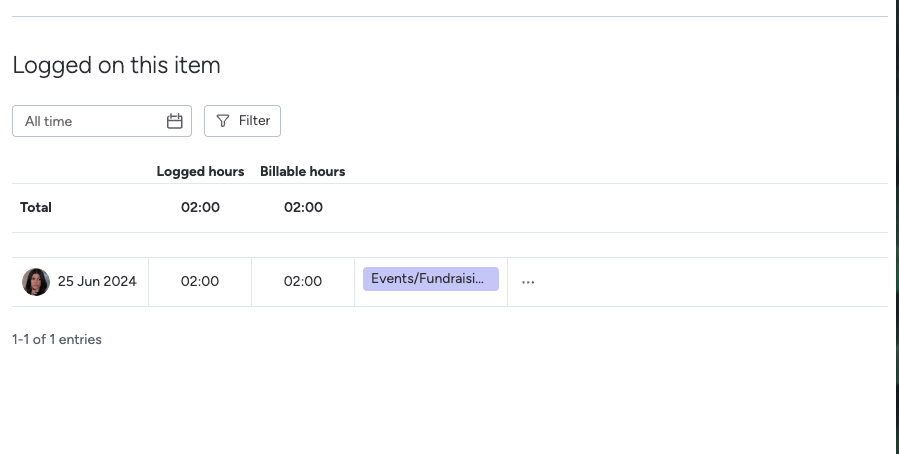
Your time records will appear beneath the fields if you scroll down. The logged hours, billable hours and category will be shown clearly. If another team member is working on the same project, their profile icon will be shown also to show their contributions.
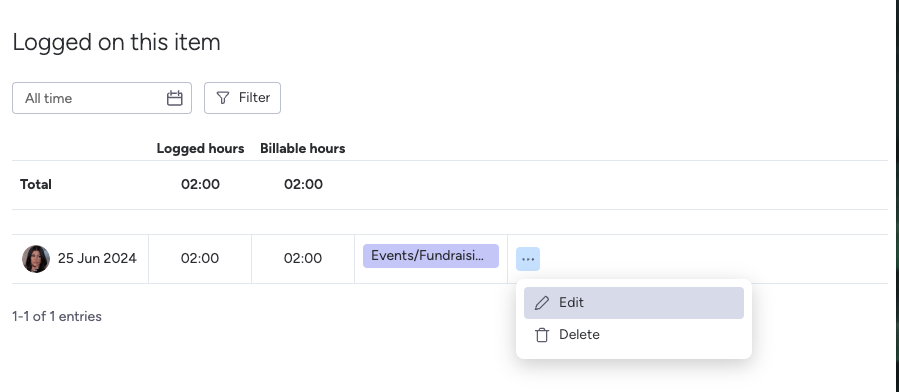
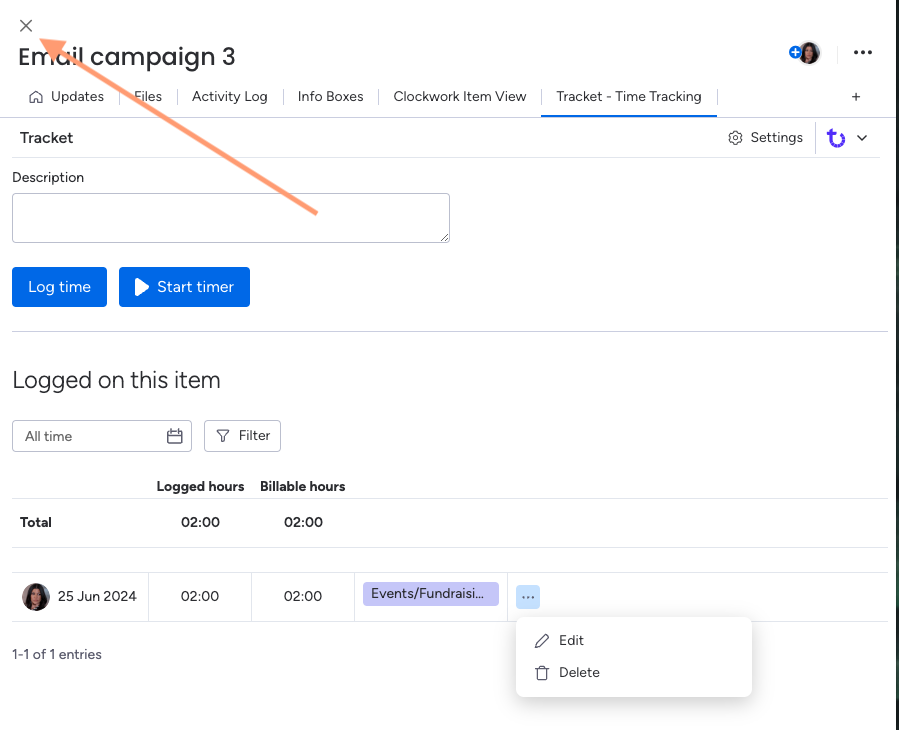
Have you made an error in your logs? There is still time to fix it. Your submissions can be edited if you feel you have made a mistake. Click the three dots on the right of the record and feel free to edit or delete the log.
Once this has been added, close the Tracket app by clicking the cross in the top right.
Integrate Tracket to Text and Number columns
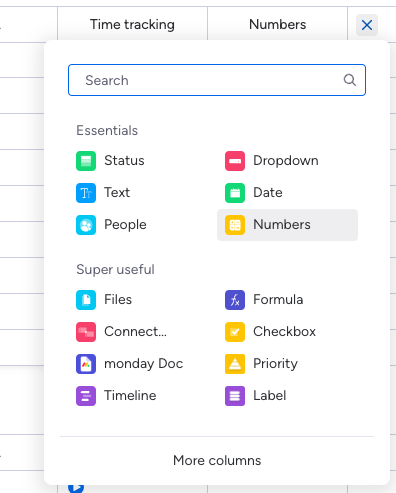
First, add a number column to your monday.com board by clicking plus and add column.

Select or search for ‘Numbers’.
This will show your new numbers column that you can now programme to integrate with your activity on Tracket.

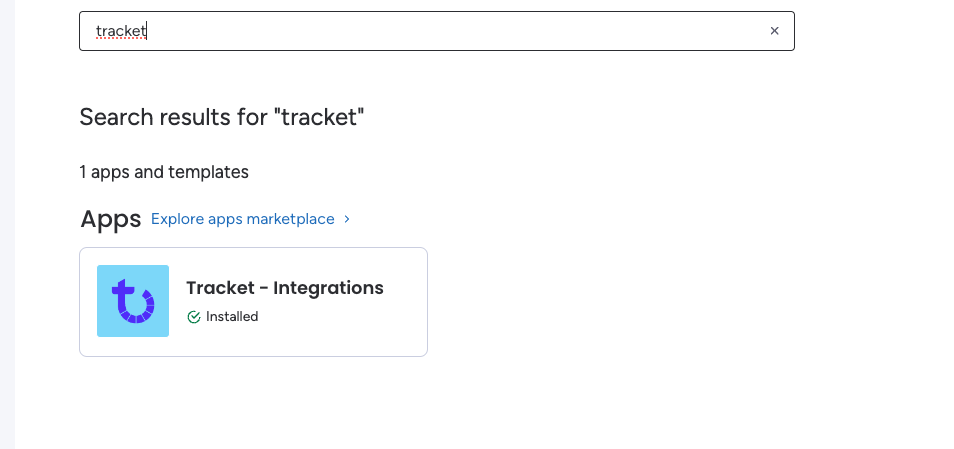
To integrate your Tracket time logs into a text or number column, click the integrate button at the top right of your workspace.
When the integrate area opens, search for Tracket and click ‘Tracket – Integrations’.
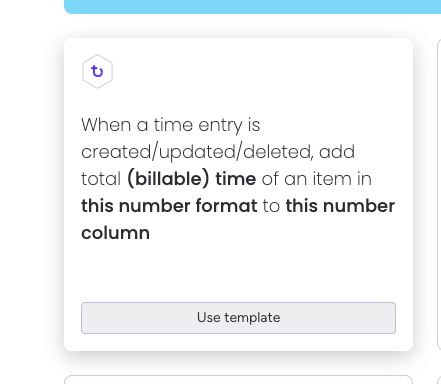
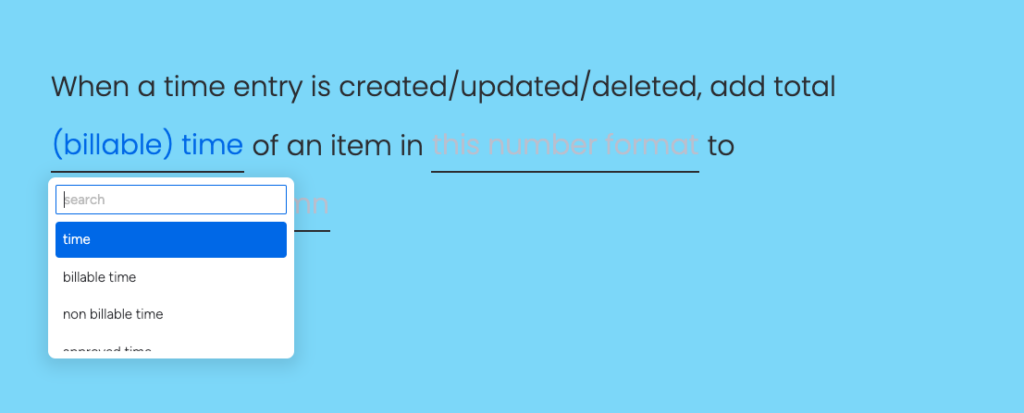
Here, we would suggest to choose the option with ‘billable time’ and ‘of an item’ instead of subitem, which you can also choose in other cases. Click ‘Use template’.
When the automation criteria shows, you can change the time type, and choose the format that will show ultimately in the numbers column.
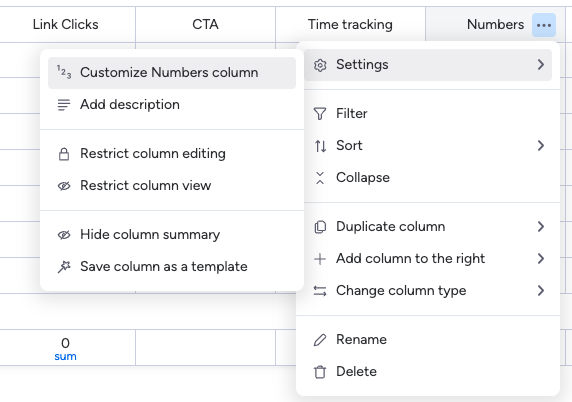
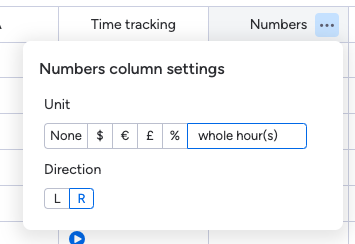
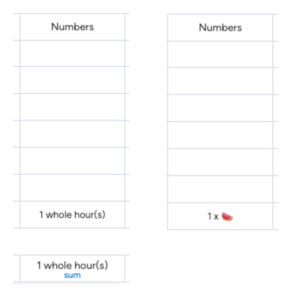
The fun part of integrating Tracket to a numbers column is that you can name the time values as anything you want. Gold stars? Prickly pears? Add some excitement to your workforce. Click the three dots to open the settings and customise numbers window.
Type your label in this field. We can confirm that it does host emojis too! But we would recommend text or numbers for reporting purposes.
It takes some getting used to at first, but once you have picked up the fundamentals of tracking your tasks, it will become an automatic step in your workflow. If you want to add to your knowledge, keep an eye on our blogs page, where we will shortly be posting a written guide on how to report your time sessions.
For any general questions about adding time tracking to your monday.com projects, contact our project management software specialists.