How to create a survey in monday.com
Surveys are a powerful tool for gathering critical data and insights from a target audience. For businesses, surveys can help collect opinions from specific demographics or assess customer experiences in-store or online. Whether you’re a restaurant owner seeking feedback from diners or a small business keen to gather constructive input from the start, surveys play a vital role for companies of all sizes.
When it comes to creating surveys, monday.com is one of the best platforms available. It allows you to create a form from scratch, add your preferred questions, and share it with customers in a variety of different ways. Once shared, monday.com gives you the ability to analyse and examine survey results to determine your most popular answers.
If you’re a business looking to create an accessible survey or a monday.com user wanting to learn more about Workforms, keep reading to discover how to use the forms feature in monday.com to create a professional survey.
1. Create a new board and form
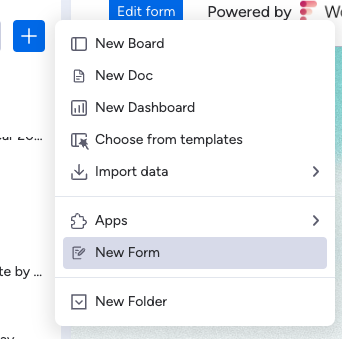
The first step to creating a survey on monday.com is to create a new board or use an existing board where you want the survey responses to be collected.
Once you’ve done this, press the ‘+’ icon and select ‘Form’. This will add a form to your board. You can either edit your form through your main board by adding columns (e.g. dropdown, rating etc.), or go to ‘Edit Form’ and create it on a more interactive and customisable screen.
Top Tip: If you’re short on time, or simply don’t want to create a survey from scratch, monday.com offers a selection of templates to choose from. For example, the Employee Engagement Survey template is an excellent option for employers to gather feedback on company culture.
2. Choose your question types
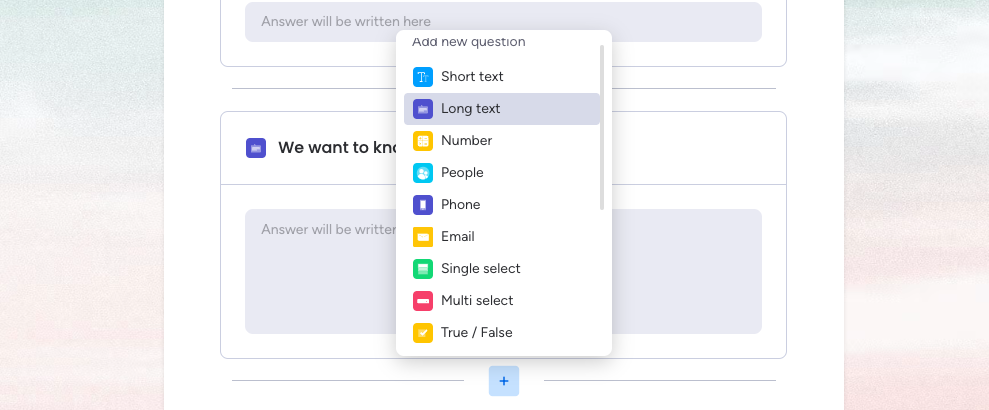
Before you create your survey, you need to determine what type of feedback you would like to collect in order to arrange your questions. No matter what type of feedback you’re after, monday.com forms have the flexibility to collect it your way.
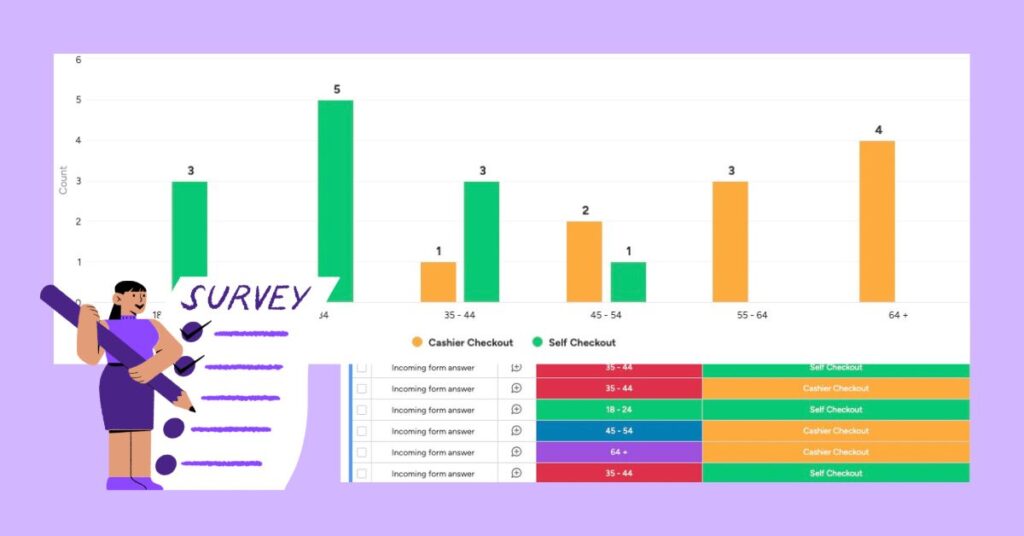
Some businesses might need to collect information about the form-filler in order to get the answers they need. For example, a supermarket wanting to find out which demographic uses a self checkout the most will ask questions about age and checkout preferences. However, some businesses might simply want to gather information about their services or products, in which an anonymous survey might be the best way to go.
Depending on the data you want to collect, your question types will vary. Rating fields allow your customers to provide a rating out of five, while single selects and multi-select (dropdowns) fields enable respondents to choose one or multiple answers (we’d suggest single selects for more accurate reporting). For more detailed feedback, you might want to add a short or long text column to capture some written responses.
3. Customise your survey
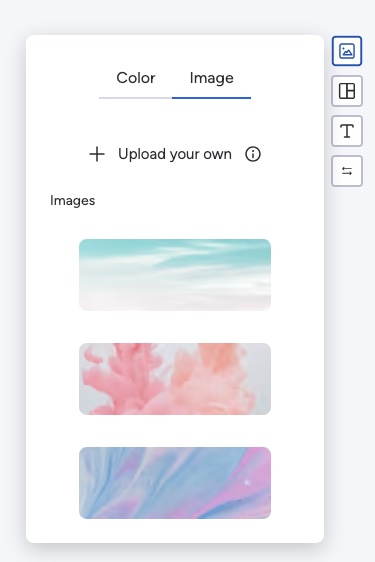
The customise tab is great for those creative form-makers looking to enhance the look and feel of a survey. Once you’ve added your questions, you can customise the thank-you screen and the branding on your survey so that the form fits seamlessly on your website or in a branded email campaign.
monday.com Workforms provides different fonts and pre-made images to spruce up your form, but you also have the option to add your own images and logo. Once you’re happy with your survey, press ‘Preview’ to see what your customers will see and make any last minute refinements to either the desktop or mobile surveys.
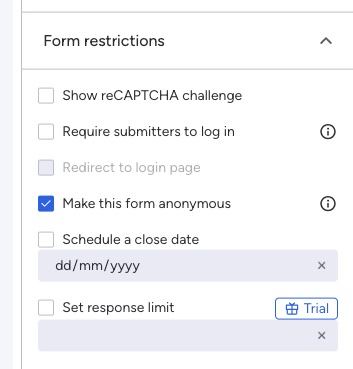
Aside from enhancing the appearance, the “Customise” tab allows you to set a closing date for your survey—ideal if you have a deadline for collecting and analysing results. You can also select a checkbox to make the form anonymous or change the text of the “Submit” button.
4. Share your survey
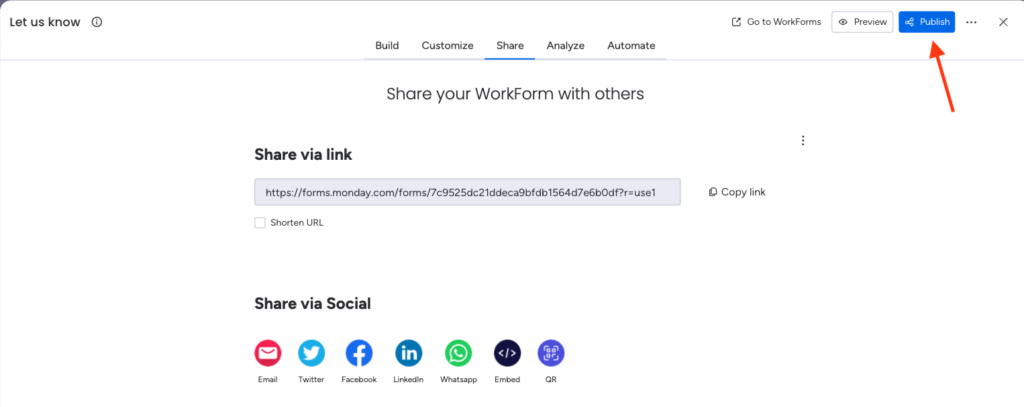
So, you’ve made the perfect survey, but what now? Depending on the type of business you are, you’ll want to send or share your survey in different ways. Luckily, monday.com provides plenty of sharing options.
Click ‘Publish’ to find multiple Workform sharing options. If you’re a restaurant wanting to gather feedback from diners, a QR code means diners can review on their mobile from their seats. Or, if your business runs primarily online, consider sharing the survey link in an email campaign or embed it into your website.
5. Collect responses in monday.com

Once you’ve shared your form around via your chosen method, it’s time to wait for the responses to start rolling in. Your survey responses will appear on your monday.com board as items, with the name provided as the item name and survey answers sitting in each column.
If you have chosen columns like ratings and single selects, monday.com will give you an average score, or display which single select answer is most popular at the bottom of the board. If you’d like to be alerted when a new form response comes in, you’re able to set up automations to notify the specific user of a new survey response. Watch our video on mastering monday.com automations to learn more about setting up alerts.
6. Analyse and compare results
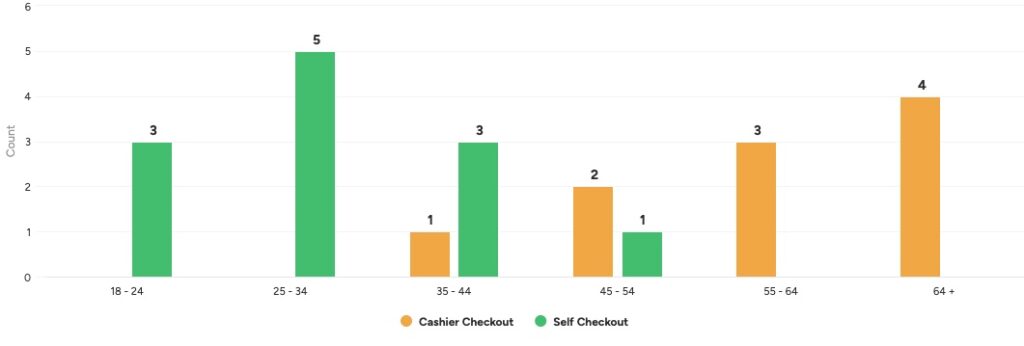
You might not want to analyse your survey responses if they contain written feedback however, most businesses create surveys to analyse data. With monday.com, your survey data can be turned into vibrant graphs or charts, allowing you to compare the most popular answers and inform important business decisions.
On your monday.com board, add a new tab and choose ‘Chart’. Click ‘Add Widget’ to see a variety of chart and graph options. Depending on the information you’d like to display, you can create different charts from scratch to highlight essential survey data.
Need some help with monday.com? From Workforms to more complex automations, our professional services team can help you build your ideal monday workspace.