How to set up lead scoring in Mautic

Nurturing leads is arguably one of the most important aspects of a business. Identifying and understanding who you should target your marketing efforts and attention to, is most of the time a blockade between your company and driving successful sales.
While your business may have hundreds of fresh leads on the mailing list, it doesn’t mean all of those leads are going to turn into sales. Your sales and marketing teams could be wasting precious time targeting the contacts that don’t even open your emails when they could be nurturing leads that show a genuine interest in your products/services.
That’s where lead scoring comes in! With marketing automation software like Mautic, you’re able to score your leads based on their interactions with your business, helping your team determine who are the best people to sell to and when.
Keep reading to learn the importance of a lead scoring system and the best practices using Mautic.
How a lead scoring system works
So, what is a lead scoring system? And what is the importance of having one? A lead scoring system allows users to utilise conditional elements to add points to a contact’s account. Lead scoring is important when analysing the value of your leads. With a point system, you’re able to see which leads show interest in your marketing efforts and which ones don’t, making it easier for your sales and marketing teams to target the right contacts.
To create a scoring system in Mautic, head to “Points”, then “Manage Actions” and select “Add New”. Once open, you’ll be able to set custom conditions of your own.
In this example, we have set the conditions to when a contact opens an email, their profile will be awarded ten points. We have also specified which email this applies to meaning, only when a contact opens the email named “This is the first test”, will they receive the points specified.

When it comes to the Mautic pointing system, it’s easy to navigate and assign scores based on contact’s interactions and behaviours. Award the lead points when they download an asset, visit a specific landing page or fill out a form. With a lead scoring model, you’re making sure you don’t waste time, effort and resources on leads that do not engage with your content.
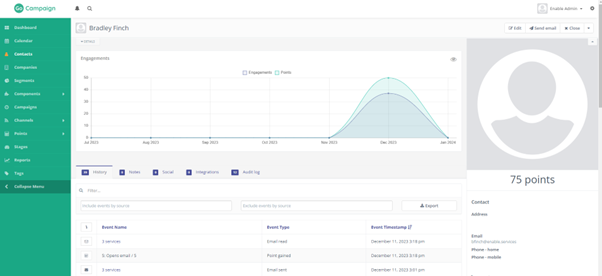
Here we can see GoCampaign has captured this contact as having 75 points from completing various activities.

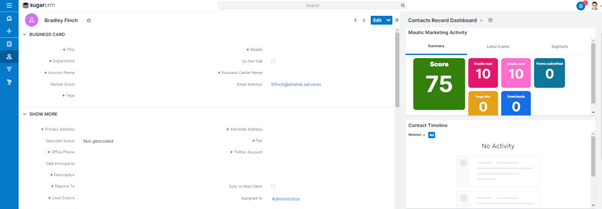
These points have been synced with the CRM system in this case SugarCRM which shows the contacts activity such as, how many emails they have read and forms they have submitted. As seen on the contacts dashboard, the points have successfully transferred into the CRM system, bringing down work silos and creating an automated, collaborative system within your business.

Create automated triggers
Triggers are a big part of the lead scoring system on Mautic, allowing automated events to be activated when a contact reaches a certain score.
To create a trigger in Mautic, head to “Points”, “Manage Triggers” and “Add New”.
A minimum number of points must be selected for the event to trigger. After you have your desired number of points, simply create the events you would like to happen when a contact reaches the threshold.
In the example below, when a contact reaches 50 points a “congratulations” email is sent out to that user automatically.


But there are many ways to use the triggers in Mautic. Perhaps your lead is interacting with marketing content but not buying your products or services. Once they’ve hit a certain point, you can send out an email with an offer or promotion to encourage them to complete a purchase – the possibilities are endless!
Creating stages to manage leads
Stages act as a customer journey for your contacts, allowing you to segment individuals based on their interaction and interest with your company, making it easier to target the right leads. To create a new stage, go to “Stages” and “Add New”.

Each of these stages have a certain amount of weight associated with them. The weight determines how a contact moves from one stage to the next, once a contact is in a stage it is not possible to move them to a stage which has a lesser weight then the one they are currently in.
For example, if a contact is in the “Medium” stage which has a weight of 50 points, they cannot be moved into the “Cold” stage which has a weight of 25. Contacts can be moved stages through either the points > triggers > “events” section, or through a campaign. So, you’re able to group your leads by importance and likeliness of sale!
If you think this might be something you or your company are interested in, don’t hesitate to contact us here at enable.services for your free 1 hour consultation.
Contact us through:
· Email – info@enable.services
Or pick up the phone and give us a call on 01473 618980. One of our team members will be more than happy to help you begin on your path to marketing automation using our in-house solution, Mautic


